Black and White Photography

Black and white photography, how do I do that on my camera?

What is it?

I have mentioned before that in terms of the photographic process, not much has changed over the last 100 or so years, yes cameras don’t use film, they have auto focus and metering systems and much much more, so why do some people only shoot in black and white?  In this blog post I will give you some reasons when and why I shoot in black and white.

How do I use it on my camera?

Every camera model does black and white photography differently, but in your menu you will have the ability to make your camera shoot in black and white, on a Canon camera it is part of the “Picture Style” menu.

BEFORE you make this change please note, if you are shooting “JPG” only, the images you take will only be black and white and will not be able to be changed to colour in any way.

I shoot both RAW and JPG, which allows me to get a JPG which is black and white and a RAW file which I can process and get a colour image from it.

You can of course remove the colour from a colour image using photo editing software, by adjusting the saturation of the image, but in my opinion I prefer it when the camera does it, I get much nicer blacks and crisper whites, but its only my opinion.  

What does it do to my pictures?

By using black and white, you can change the mood of a picture, remove a highlight from a picture where something brightly coloured would distract the subject or just enjoy the highlights tones and shadows of the subject that you are capturing.

Examples

black and white photographyIn these two examples, the bright colours take your eye away from the scene, and distract the viewer dragging their eye to the bright colours instead of exploring the scene.

black and white photographyIn this image I was shooting the duckling (with a Canon of course) through some reeds on the river bank, even though the reeds are very out of focus, this was done by using a very small aperture, the colour distracts the eye away from the duckling.   

black and white photographyWith this image, the dynamic range was quite large a HDR could have been used to get colour in the sky and the details under the trees, however in black and white the slightly overexposed sky is grey and the slightly under exposed sections in the trees are black.  The eye is drawn to the correctly exposed light post.

black and white photographyWhilst doing the wedding dance the DJ decided that his 4 colour disco lights were very cool, the light from them however really messed with the white balance of the ambient lights, by changing to black and white, the images are only of the moments being captured, and not the crazy colours in the picture.

Try This

Grab your cameras manual, or google how to change your camera to black and white, go out and have some fun. That’s what photography is all about, experimenting and trying new things.

Exposure Triangle

When shown the exposure triangle for the first time I nearly cried, it made no sense and was so hard to understand.

As my photographic courses are aimed at the beginner level, I wanted to create an info-graphic to help people understand how shutter speed and aperture interacted with each other.

The exposure triangle also includes a third axes which is ISO, however, I feel that this confuses beginners, when this interaction is fully understood, the concept of how ISO affects the images is easier to comprehend.

The two sides to photography I teach are, understanding how aperture affects how much of the image is in focus, and how shutter speed either freezes action or blurs movement.

This info-graphic shows how they interact, please share it with anyone who you think might want to see it.exposure triangle

Time lapse photography

What is it?

Time lapse photography is a technique that involves taking lots of still images and then using the images to make a short video.

Generally a time lapse photography would be taken on a tripod of a scene where things are moving through the scene, a building being erected, a sunrise or the stars moving across the sky. The images are taken with some sort of remote picture taking mechanism like an intervalvometer.  If you ever watched any of the Wallace and Gromit movies, this sort of animation is time lapse. You could also have the camera mounted on a sliding rail so the camera moves between the frames to give a different effect.

How do I use it on my camera?

You will need to pick a location that will allow you to get the movement you want, the simplest is the clouds moving across the sky and the sun rising or setting in a sunrise or sunset. You will need a tripod and a remote shutter cable with a intervalvometer, this is a device that will allow you to set the number of images you take and the timing between the images. Depending on the make and model of your camera, some are now incorporating this feature into the camera.

The next step is to set up, and sit back and take the pictures. Video plays at 24 fps (frames per second), that’s industry speak for every second of video you watch has 24 still pictures in it, so if you want to create a 1 minute time lapse of a sunset you will need 60 (seconds) x 24 (frames) = 1440 images. Stretching a sunrise over 1 minute though may be a little too long, so making it much shorter may be better.

So you will need a few things other than the tripod and intervalvometer, before you start you will also need to have a fully charged battery, a memory card big enough to capture all the images, note that 1080p video or “HD” is 1920×1080 pixels, or approximately 2 mega pixels! Yes most cameras are at 3 to 15 times larger in megapixel size. So you could reduce the image size in your camera to allow the memory card to hold more images without reducing the quality of the video.

So how do I set up the camera? Depending on the type of scene you have selected it may be as simple as using the camera in Aperture Priority mode and allowing the camera to set the rest of the settings, note that if you are doing a sunset, the images will get darker as the sun sets, so you need to factor what the last images settings will be in order to make sure all the images work. A simple way of making sure the camera gets the same style of images across the entire set of images, is to use auto ISO so that as it gets darker the camera adjusts the ISO to suit.

Once all the images are taken, you will need to use video production software to make a slideshow, both Windows and Apple users will have inbuilt free software that will do this.
Examples

Here are a few of the images that were taken for the video.

Time lapse photographyDicky Beach:  Canon 5D Mark II, ISO 1600 F4 30 seconds.

Time lapse photographyDicky Beach:  Canon 5D Mark II, ISO 1600 F4 30 seconds.

Time lapse photographyDicky Beach:  Canon 5D Mark II, ISO 1600 F4 30 seconds.

Try This

Find a spot where the sun sets or rises and you can take about 10 minutes of images as the sun rises, remember to be set up just before the sun breaks, take a photo every half a minute for ten minutes that’s only 20 shots and you could do that manually without the intervalvometer, using the 10 second self timer. Most windows and mac computers come with movie making software that will allow you to put the images together and make a video.

Sigma Art 50mm F1.4

The new Sigma 50mm Art F1.4 lens would have to be the best built non Canon lens I have ever owned. That is a big statement, and below I would like to explain why I picked this lens up and why I had to have it in my kit bag.

Sigma Art 50mm F1.4

A little about why I had to have one
When I am not teaching photography I am usually in a gym or CrossFit box doing indoor action photography, usually in very poor light, yes the ISO technology has come a long way and ISO 6400 is very usable on my 6D, but like everything I wanted more. I own the three aperture F2.8 lenses the 16-35mm 24-70mm and 70-200mm all Canon L series lenses and all have amazing optics, and fast focusing USM, Canon terminology for Ultra Sonic Motor. I had been using the 16-35mm and 70-200mm in these gyms, and found that the 70-200mm was too long, to get the images I wanted, I needed to be a step or three further back, and then people at the events would not see me and walk between me and the subject, it’s a busy competition so it is hard to stop people doing that.

I needed something shorter, yes I do own the 24-70mm, but I also wanted to separate the competitors from the background more than the F2.8 allowed, and wanted a little more light in these dark scenarios so I could use a faster shutter speed. I started looking at alternatives, Canon make a very very nice 50mm F1.2 L series lens, has the same USM focus system as all my other L series lenses and is F1.2!!! It’s quite an expensive lens, and I could not justify the expense to trial the lens. I had thought of hiring it for a weekend, but instead bought a Canon 50mm F1.4 lens, it is not an L series lens, its focus system is also USM, but not on par with the other L series lenses I own. I used it at a few competitions on a 7D mark II and I really liked the length and how it felt in terms of crop and closeness to my subjects, without being in their face I was getting a nice cropped image of the athlete.

Sigma Art 50mm F1.4CrossFit: 7D Mark II, Sigma Art 50mm F1.4 F1.4 ISO 1000 and 1/350th the ability to take the background out of the picture and crop in to get the shot is just right.

So I had proved I liked the length on my 7D Mark II, but the images were a little soft, and occasionally, especially when shooting at F1.4 the images were just out of focus. I had read that this was not uncommon, and that it was part of that lens.

So now I had a problem, I liked the length, needed the F1.4, what to do. The release of the Sigma Art 50mm F1.4 fixed all that. I had read that the optics of this lens were very very good, some say that optically, it is the best 50mm lens on the market, but the ability to focus was my concern.

I wanted to test the focusing ability of the lens, I went into digiDIRECT in Adelaide Street, Brisbane and spoke to Emma, they had one on the shelf and more in stock, the first thing I noticed was it was very well made, the body is all metal, and it is quite heavy, I like the weight in my hand, as it makes it feel purposeful, it has a plastic switch for turning off the focus, but importantly has a large easy to grip focus ring, that allows you to manually override focus at any time. It uses a 77mm filter thread too, which is great as all my other lenses have the same size.

I put it on my Canon 7D Mark II  and had a trial, whilst in the store I did a near focus far focus test, focusing on the counter and then focusing on the buildings across the street, then coming back to the counter, I was impressed! The lens uses the HSM; the Sigma trade name for Hyper Sonic Motor similar to the USM of Canon, and it is as good as the Canon L series lenses I am currently using.

I was hooked, I needed one NOW! Of course digiDIRECT had them in stock, I walked out happy!

What does it do to my pictures?

After all that writing, the proof is in the pictures, taken on both the Canon 6D and 7D Mark II, I really love the creamy out of focus background that this lens creates, and how it really allows you to separate the subject from the background.

Sigma Art 50mm F1.4
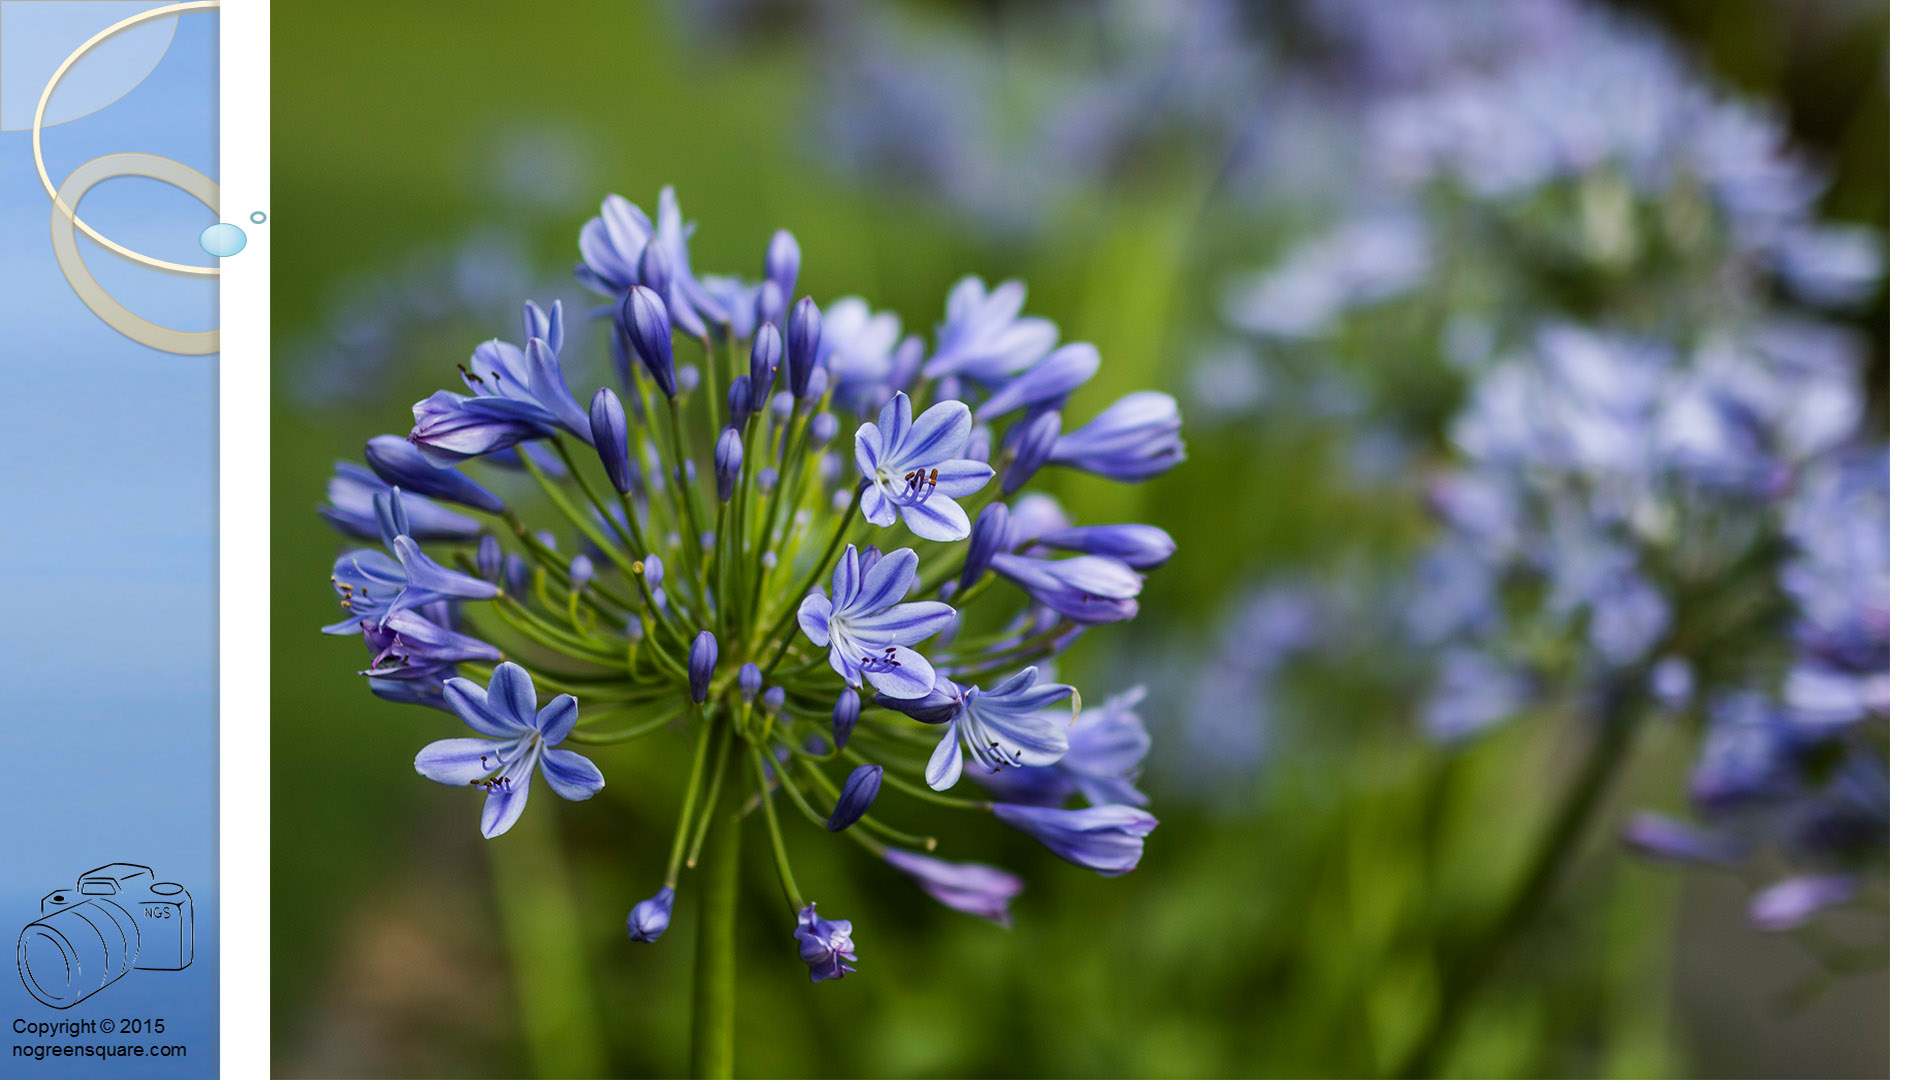
Agapanthus: 7D Mark II Sigma Art 50mm F1.4 ISO 100 F1.4 1/6000th. The little flowers on the back of this stem are already starting to blur away.

Sigma Art 50mm F1.4Bike rider Riverside: 6D Sigma Art 50mm F1.4 ISO 100 F1.4 1/4000th the rider is separated from the background.

Sigma Art 50mm F1.4Bamboo: 7D Mark II Sigma Art 50mm F1.4 ISO 100 F2 1/8000th even shooting into the sun, the lens has little lens flare (lens hood included with the lens) and did not have trouble focusing on the backlit leaves.

Sigma Art 50mm F1.4Best man speech: Canon 7D mark II Sigma Art 50mm F1.4 ISO 1600 F1.4 1/125th having the F1.4 aperture allowed me to shoot at a reasonable shutter speed to get the shot.

At about half the price of the Canon 50mm F1.2 L series lens, the Sigma Art 50mm F1.4 lens is very good value. The Art range of lenses represents a major step forward for Sigma, they are no longer just a manufacturer of great glass, they are now incorporating excellent build quality and amazing focusing technology. They used to say Sigma lenses were half the price for 95% the quality, I think that is no longer true.

Low Light Photography

I read a post about low light photography on another website that I thought was going to give the reader some amazing insight, instead the first point on the list was to buy new equipment. I was a little disappointed as I was expecting it to be about how to get the best of what you have, not spend more money to get better photos. So here are a few quick tips to use what you have to get better photos.

Low light photographyThis shot was taken at 16mm and hand held at 1/8th of a second. I have steady hands.

If you only have the lens that come with your camera, and the lens has floating aperture and ranges from F3.5 – 5.6, it makes sense to use the lens at the F3.5 aperture setting, which means you wont be able to zoom. You will need to use foot zoom instead (walking closer)

Use a high ISO,  most new cameras have at least ISO 1600 many have ISO 6400 and beyond, yes the picture will have noise, but, is a noisy picture that is not blurry better than a blurry photo, don’t be scared to use the highest setting and see what the pictures look like.  If you are not blowing the images up and making them large, the noise will be insignificant in some cases.

Use a slower shutter speed, if you are using the lens that comes with your camera, and using it at F3.5 it also means your lens will be at about 18mm focal length. The general rule for hand holding a camera is 1/focal length, in this case 1/18 (say 1/20th), it is best to test how good you are at hand holding these sorts of speeds, or even testing if you have steady hands and can hold it steady for an even slower shutter speed. Note: if you are photographing moving subjects this will not really work, unless you are panning with them. Best to brace yourself or use something to keep you steady.

Low light photographyThis shot was taken at 70mm and at 1/8th of a second, hand held, I used a tree to help me hand hold this at such a slow speed.

Be aware that your cameras light meter may not be reading the scene properly, if you are in a dark room and taking a picture of a person blowing out the candles on a cake, the dark room will make the camera expose for the darkness in the room,  not the brightness of the candle, you can change the settings to suit the light of the candle, give it a try.

If you don’t own a tripod, you can always use a chair, bin, can, drum or anything else you can rest your camera on. A small bean bag works or bag of rice works a treat. Note: you get to eat the rice after too. You can even put your camera on the ground which gives you a different perspective as well.

If you do not have a cable release which is a device that allows you to remotely trigger the shutter with out jarring the camera when you press the shutter button, you can set your cameras self timer which is a 10 second delay, the setting that allows you to get into the picture.

Low light photographyThis image was taken using the self timer, as I did not have a self timer, it was one of the first images I took on my Canon 300D camera with the lens that came with the camera.

By using the above strategies and testing your camera so that you understand how it will work in these situations, the next time you are in a poorly lit room, you will be better prepared to tackle the little light you have head on.


Why did I buy a Canon EOS 6D

It is a very good question indeed. As a very technical shooter, who likes to twiddle with all the knobs buttons and settings on a camera, and who after all is teaching that the camera does not make the photographer, some of my decision was based on practicing what I preach.

I recently upgraded from a 5D mark II and a 7D, I have always used two bodies, as each had its advantages and disadvantages, but they complemented each other. The 5D II was great in low light (for its age) and the 7D was a focus monster for the money it cost at the time. I originally bought the 7D to replace an aging 1D Mark II.

In 2013 just after the 5D mark III was released, a friend of mine who has a great mix of bodies and lenses (1DX’s and 5D III’s) asked me to help him out as he was double booked. It was motorsport and of course I said yes. As payment he offered me his 5D III for about a month to have a bit of fun with. I ended up taking about 5 to 6 thousand images on the camera as well as doing a wedding. It was fantastic it focused like a machine (better than the 7D and had amazing capabilities even at ISO 25600! It was sorted when I could I was going to replace my 5D II with one.  So why did I buy a Canon EOS 6D?

When Canon released the 6D, it was full frame, it had the same ISO capabilities as the 5D III, which was one of the things I really “needed” it didn’t have the focus system of the 5D III but the important thing was it was much better in low light focusing than the 5D II, the biggest let down of the 5D II (in my opinion). I had seen a few friends buy them, and I asked them how they liked it, most were all amazed by its abilities.

This advantage seemed so trivial at the time, but I have found it to be a very great little feature. WIFI! Who would have thought, I can connect the camera to my phone, and have a shot on my phone and be able to email it to a client (in low resolution) within seconds of it being taken. Yeah it sounds trivial but it’s amazing.

One disadvantage was the need for new media cards, as I had been using compact flash, and now needed SD, they are larger in capacity and faster in read / write speed for the same sort of money, so that was that much of a disadvantage.

The most obvious thing of course was cost. The 6D was conservatively half the price of the 5D III which is a lot of money to some people and can be hard to justify. The bigger question was “is the 6D half the camera that the 5D III is?”

My simple answer is NO.

My longer answer is this, for the type of work that I expect the 6D to do (I do not need the amazing focus abilities, I bought a 7D II for that) I do not need the 6D to take more than 4 frames per second (I bought a 7D II for that) I need the 6D to focus in low light where I would be using the camera with no flash and very high ISO. And this it does amazingly.

Here are some images taken on my 6D some in my testing phase, this is where I push the camera to see what it is capable of.

I will explain what aspect of the camera I was testing with each example.

Why did I buy a Canon EOS 6DISO 1600 F2.8 1/15th and no tripod. I wanted to test the abilities of this camera with high ISO and a mixture of bright and dark areas in the same picture. Usually with high ISO you see the grain in the darker underexposed areas.

Why did I buy a Canon EOS 6DISO12800 F2.8 1/250th, I really needed to be able to freeze the action here, and to do that I needed to use a faster shutter speed, also the athlete was moving, and was back lit, so I was testing the focus tracking in these poor lighting conditions.

Why did I buy a Canon EOS 6DISO 12800 F2.8 1/180th trying to catch the cat in front of the camera I needed to use a fast shutter speed, to do this indoors at night, I needed a very high ISO, this image has very little noise for a shot at ISO 12800.

Why did I buy a Canon EOS 6DISO 1600 F1.8 1/30th taken with a 28mm F1.8 lens (yes that is not an L lens) I wanted to see if the focus would work on fast moving objects in very poor light while panning. Cars were doing about 60 km/h.

Why did I buy a Canon EOS 6DISO800 F1.8 1/60th taken with a 85mm F1.8 lens (yes that is not an L lens) again I was testing the highlights against the darkness in the spots. And focusing on a moving target that is backlit.

Footnote: the 6D has a custom function menu just for its focus system (the 5D II had one of these that allowed you to turn on 6 extra focus points to assist the centre spot only and only in AI-Servo I had this turned on of course) this custom function is set by default to let release the shutter (take the picture) even without focus lock, which means you may not get a focused shot.  This is in the user manual the chapter starts on page 301! Past video image processing and so much more, the page you need is 308 but read the whole chapter, as it is all VERY helpful in helping you customise the camera to make it do what you want it to do, the next custom function controls how the camera takes the next image.

Why did I buy a Canon EOS 6D

Startrails compared to Starmaps

What are they?

In this post we will discuss the differences between startrails compared to starmaps, and how to take each sort of photo.

The differences

A startrail is usually a night time shot of the sky that shows movement in the stars, which is of course all wrong as the stars do not move, the Earth rotates as the stars stay still! A star map however shows all the stars across the sky as single points.

How do I take either one on my camera?
Starmaps

Starmaps are the easiest of the star shots to take. All you need is a camera that can take pictures at ISO 1600 without too much noise, a tripod and a wide angle lens with a small number aperture. A kit lens like the Canon 18-55 F3.5-5.6 has a reasonably small number aperture F3.5, enough for a good try at a starmap. A remote shutter cable can be useful but is not required; you can use your cameras self-timer.

Make sure you are as far away from the city lights as possible, and of course you need a clear night with no clouds, if you pick a night with no moon you will get more light from the stars and more stars in your map!

Your camera will have a very hard time focusing on the night sky, so it is best to turn the focus off and using the view finder or live view focus on the stars. I prefer to use live view, zoom in on the back of the camera to a few of the bright stars and then focus manually.

Set the camera manually (M mode) and start with these settings, aperture F3.5, ISO 1600 and use a shutter speed of 15 seconds.

Startrails compared to StarmapsYou should get something like this; this was taken on a 5D Mark II, ISO 1600, F2.8 and 15 seconds. This shot is a wide panorama of 11 images that have been put together.

You can make the stars brighter by increasing the shutter speed from 15 seconds to 20 or 30 be careful though as any longer than this and the stars will blur. Increasing the ISO number from 1600 to 3200 or more depending on your cameras capabilities, if you have a lens with a smaller aperture number, then use the smallest number you have.  If your shot is too bright, you can darken the shot by reducing the shutter speed (less time) decreasing the ISO (smaller number) or increasing the aperture number. It is best to use the smallest number ISO you can.

Startrails

Startrails are almost the same. You will need a tripod, camera and wide angle lens with a small aperture number, you will need a shutter release cable, or an intervalometer, this device can be set to take a certain number of pictures that have the same shutter speed.

With startrails it is of course better to get as far away as possible from the city lights, as you will get more stars in your trail, but with software like Starstax or Startrails, you can easily shot lots of images and add them together, this is my preferred option. Starstax is a little easier to use, Startrails has the functionality of making a video built in.

Most of my startrails are setup as above, with my starting settings of F5.6 ISO 3200 and shutter speed of 30 seconds. The reasoning behind lots of short shots, is that in a 30 second shot there may be a light or something that ruins the exposure, in this case it has ruined one exposure in many, if I was shooting 6 or 8 minute shots, it has ruined the entire shoot and startrail.

Startrails compared to StarmapsThis was one of my first star trails, 5D Mark II ISO 400 F2.8 16mm and 300 seconds per shot. I was using a intervalometer to do the 300 seconds, and the gap between each shot. In shot 3 of 5, a car drove past and lit up the trees in the foreground. This could have ruined my startrail, but in this case it made it even better. This is a 25 minute shot!

As you can see in the above the stars a spinning around a central start, this star or spot is called the Celestial South Pole. I will show you how to find it soon.

Startrails compared to StarmapsThis was taken the same night as the shot above, by turning 90° left from the Southern Celestial Pole, you get this sort of startrail pattern. 5D Mark II, ISO 800 F2.8 and 225 seconds. 6 images in total. So this image was 22.5 minutes.

So how do you find the Sothern Celestial Pole?

Startrails compared to StarmapsI have circled the Southern Cross and the two pointers in this picture. I have drawn an imaginary line through the long part of the Southern Cross and a line between the two pointers. Where those two lines cross is the Southern Celestial Pole. You can also use phone apps and other star maps to help, but some of those apps may need an internet connection, which in the middle of nowhere, to get away from all the city lights you may not have. There are some apps, which will also give the trajectory of the Sun and Moon. They can be handy too.

Startrails compared to StarmapsThis is the result. 5D Mark II ISO 400 F2.8 and 300 seconds, there are 9 images in this startrail, which is a 45 minute photo. I wanted the stars to rotate around the tree. This was a moon lit night and the light on the background was due to it, it did reduce the amount of stars, but I like the background in this shot.

So if the above long shutter speed shots work why use lots of 30 second shots? Below is a great reason.

Startrails compared to StarmapsThis is 125 shots stitched in Starstax, each shot is 10 seconds, at F5.6 and ISO 400 that’s a 20 minute photo, if we were to use the settings from the shots above, the long exposures would make the house and street in front of me too bright, I would see more stars, but the remainder of my image would not be correct, also a few too many lightning strikes could ruin the photo. So this image has lightning a startrail and planes coming in to land!

Startrails compared to StarmapsThis shot is made up of 115 shots stacked in Starstax, each photo was taken at F3.5 ISO 1600 and 30 seconds, 57.5 minutes. Using long shutter speeds would make the foreground too bright, and ruin this shot. The clouds started to cross the sky as I took them, but I like the effect they have given the shot.

Try This

On the same night set yourself up to take both a Startrail and a Star Map, make a night of it, and invite some friends with you, will give you something to do while your camera is doing all the work.

Post up some of your pictures! Would be great to see what you have captured.

Flash Photography

What is Flash Photography?

There is some times when you are taking a picture that you want to add extra light to your picture; most of you have a flash built into your camera. It sits on top of the camera and the camera will pop it up when it thinks you need it, only if you are using the fully automatic green square.

There are a few problems with this in built flash; It’s very small, and will usually only work for subjects that are about 1 to 3 meters in front of you. You can get a little more range by using a higher number ISO, it will also use less battery power, and be ready to use quicker.

How do I use Flash Photography on my camera?

Most cameras have a button to pop up the flash, and some will have it in a menu. When it is up, the camera will usually do some things that may seem a little odd. Generally the camera will not let you set a shutter speed setting that is faster than 1/180th or 1/250th. The reason for this is very long and very hard to explain, what you need to know, is that outside in daylight the small flash on your camera will do very little.

Because of the pop up flash limitations, external “flash guns” can be bought, which can have up to about 7 times the power, some have the ability to high speed sync which allows you to set a shutter speed which is faster than 1/250th, and turn the flash away from the subject that will allow the flash to do other things.

These external flashes have their own batteries and can recycle to flash again quicker, and they can be taken off the camera and used very differently. Some cameras have the ability to remotely fire the flash using the on board pop up flash or inbuilt wireless, read your manual for more information.

What does Flash Photography do to my pictures?

By using flash it allows you to change the light in your pictures, but it can add seen shadows behind the subject in your pictures. By changing where the flash is you can remove these shadows or use the shadow to give the photo a different look.

Examples

In the following examples, I have used the on board pop up flash, and then rotated the camera to show the “portrait shadow” from the flash being to the right. Then I have moved the flash to different spots, using a remote flash trigger. All the images were taken with ETTL flash, which is an acronym for Electronic Thru The Lens, which is an automatic mode of flash which uses a small flash before you take the picture to measure how much flash it needs to use. I will explain where the flash was and how it’s changed the picture, but not how powerful the flash was set, or the pictures settings.

Flash PhotographyBy using the pop up flash on top of the camera you can see the flash shadow behind the subject, the trouble is that a portrait is usually shot in that way, with the camera rotated 90° which will move the shadow.

Flash PhotographyWhen the camera is rotated 90°, the flash is now to the left of the subject and casts a shadow on their right, the shadow is also very distinct and very harsh.

Flash PhotographyThe remaining shots are taken with the external flash, and positioned in different places and using different techniques to get different effects. In this one the flash is above the subject and to the cameras right, the shadow on the wall is strong, and it has also cast a shadow of the subjects left arm on the subjects left leg.

Flash PhotographyBy lowering the flash and moving more in front of the subject you can now see the shadow has been cast upwards and away from the subject, I have also minimised the shadow of the subjects left arm on the subjects leg.

Flash PhotographyThis time I have moved the flash so that it is almost right beside the subject, this is casting a shadow across his chest of his arm, and giving his nose a little shadow as well. It has removed the shadows behind the subject completely.

Flash PhotographyThis shows how moving the flash to the wrong place can cast shadows in the wrong places and can cast shadows over the subjects face.

Flash Photography

I have used a diffuser, in this case a piece of A4 white paper in front of the flash to soften the light, you can just see the subjects shadow behind them, by putting the flash up high it has also lit up the subjects face nice and evenly.

Flash PhotographyStill using the diffuser and putting the flash in front of the subject, you can see that the subject is evenly lit and the shadow is soft from the diffuser.

Flash PhotographyThese last two images I have turned the flash away from the subject and bounced the flash off the ceiling, as you can see it is a little dark, as the ceiling in this room is high, compared to the subjects height, you can adjust this by telling the camera to use more flash. Look in your manual about “flash compensation”

Flash PhotographyIn this last picture I have bounced the flash off a wall next to the subject, in this case it was a white piece of paper, but it could have been a wall or a large white bed sheet. I placed the flash still quite high, there is now no shadows behind the subject and there is nice soft light across the face giving the subject cute cheeks.

Try This

If you have a pop up flash, use a small piece of paper to diffuse the flash, note this will reduce the flash range increase your ISO if you need to, tracing paper will also work, or a small piece of a plastic milk carton. If you have an external flash, try to direct the flash onto a wall or the ceiling next to the subject, this is called bounce flash, the light that bounces onto the subject from the wall will be nice and soft and very even.


Top Travel Tips

Here’s our Top Travel Tips for Photographers:

1 Take your charger, even if it’s only a weekend away! Charge the battery every night to ensure your camera is ready when you need it. And remember, cold weather shortens the life of batteries.

2 Take lots of memory cards. They’re cheap, and why risk missing out on that once-in-lifetime shot because your memory card is full? Make sure you format them in the camera before you leave. If you are planning to take lots of pictures and are wondering whether to buy one big card or several smaller ones, we recommend buying many smaller ones. If you lose the one big card, or gets damaged/corrupted in some way, you will lose all your photos.

3 With this in mind, don’t be scared to take one extra photo. You may never come back! Also, don’t delete a picture off the back of your camera without first looking at it in on your computer. The camera’s screen is too small to have a thorough look at the image and you might miss something interesting in the background.

4 Backup the pictures! Keep the used cards separate from your camera (and secure) in case it gets lost or stolen.

5 Be aware of visiting places where taking pictures may not be condoned or may be against the law. As a rule of thumb, avoid photographing inside airports, at border crossings, where there are police or military officials etc. Respect signs that say “no photography”. Also, different countries have different laws about what is acceptable as far as photographing people – research this before you go!

6 If you don’t have a tripod, a bin/chair/or the ground can be a great makeshift tripod.  

7 If you are taking pictures at night, and the camera suggests using a tripod or you cannot get sharp photos because the shutter speed is too low, you can use your camera’s self-timer for a hands-free shot that minimises camera shake.

8 Use your shadow as a guide. It’s best to keep your back to the sun when taking pictures so if you look down and see your shadow you’re looking the right way. Of course this is not always possible.

9 Be creative and don’t forget to change your point of view. Don’t just arrive at a scene and take the first shot you see. Remember to think about WHAT you would like to highlight in the scene.

10 Keeping a shopping bag in your pocket or camera bag is a great way of protecting your camera if it rains.

11 Test your camera before you go away. Learn how to use it, and try not to buy it the week before you go away. If you’re flustered and have not read the new manual or are not familiar with the camera, you may not be getting the best out of it.

These tips will ensure that you capture some awesome memories of your trip. And on a final note, make sure you have the camera ready at all times – you never know what’s around the next corner.

Examples

Here are some photos from our travels. Head on over to our No Green Square Facebook page and post your best travel photos.

top travel tipsSunset over Mount Fuji from the Shinjuku Government Tower, Japan

top travel tipsSunrise over Ankgor Wat, Cambodia

top travel tipsJunks in Ha-Long Bay, Vietnam

top travel tipsLake Manchester on Fraser Island, Australia

Try This

While traveling, keep your camera handy and ready to take photos.  Try to get some shots that are a little different from the norm, using a different angle or perspective.

The making of Natural Bridge HDR

What is HDR?  Why would you use it?  What is it good for?
HDR 131227 Natural Bridge 242-249

The simple answer is this.

HDR is an acronym for High Dynamic Range

What is Dynamic Range?

It refers to how we see light and what we see. Its measured in stops of light, our eyes see about 13 – 14 stops of light, most consumer digital cameras will record about 9 stops of light.

We can see details in the bright and dark areas of a scene that our cameras cannot record. In some cases it is the answer to “Why don’t my pictures look like what I was seeing”.  

This photographic technique allows you to get more detail into your pictures than your camera is capable of recording by taking multiple shots that are set to different exposures and combining them together.

Usually three or more shots are taken: underexposed, correctly exposed and over exposed (-,0,+).  Your camera may be able to do this automatically with a function called “bracketing” – your manual may explain this in further detail. These multiple images are then blended with third party software or in camera to create one image.

This technique is handy when a scene is unevenly lit, an example of this is a place called Natural Bridge, its in the Springbrook National Park in Queensland. There is a wonderful sun lit waterfall in a cave.

The shot below is exposed for the light on the waterfall and the light outside.

HDR 131227 Natural Bridge 242_1

Note that there is no detail in the underside of the cave, but the rainforest and waterfall are exposed properly.

This next shot is exposed for the underside of the cave.

HDR 131227 Natural Bridge 249_1

Note now that there is no detail in the rainforest outside and there is little detail in the wall and the waterfall.

The next shot is in-between both of the two shots above.

HDR 131227 Natural Bridge 246_1

There is loss of details in the darker areas and loss of details in the rainforest, but there is nice light on the rocks in the foreground.

If we combine these images using HDR processing techniques, we will get the composite of the lights and darks. You can now see the details in the underside of the cave and the details in the rainforest.

HDR 131227 Natural Bridge 242-249

This image was combined in Photoshop, using the built in HDR tools. Some of the newer cameras will process this style of image in the camera.

Some people believe that this is no longer photography, and is more akin to art. I believe that if you need to use this style or process to record what you see, then do it.